
In today’s digital age, securing online communication is more important than ever. Self-signed certificates are one way to enhance security by providing an additional layer of encryption. OpenSSL is a popular open-source tool that can be used to create self-signed certificates. In this blog, we will discuss how to create self-signed certificates with OpenSSL.
What is OpenSSL?
OpenSSL is a widely used open-source toolkit implementing the SSL and TLS protocols. It is commonly used to implement secure communication over the internet, including web browsing, email, instant messaging, and VPNs. OpenSSL provides a robust set of cryptographic functions and protocols that can be used to create self-signed certificates.
We can use OpenSSL on all the operating systems such as Windows, MAC, and Linux.
If you want to install latest version of OpenSSL on your system click here.
Difference between CA signed certificate and self-signed certificate
The major difference between CA signed certificates and self-signed certificate is the certificate’s issuer:
| CA signed Certificate | Self-signed Certificate |
| Issued by a Trusted Certificate Authority | Self-issued by user |
| Trusted by browsers | Not trusted by browsers |
| Must be paid | Freely available |
| Valid for a specific period | Valid for as long as the user needs it |
| Certificates can be revoked by a CA | Cannot be revoked by any party except the user |
Here is what we do to request paid SSL/TLS certificate from a well-known Certificate Authority like Verisign or Comodo.
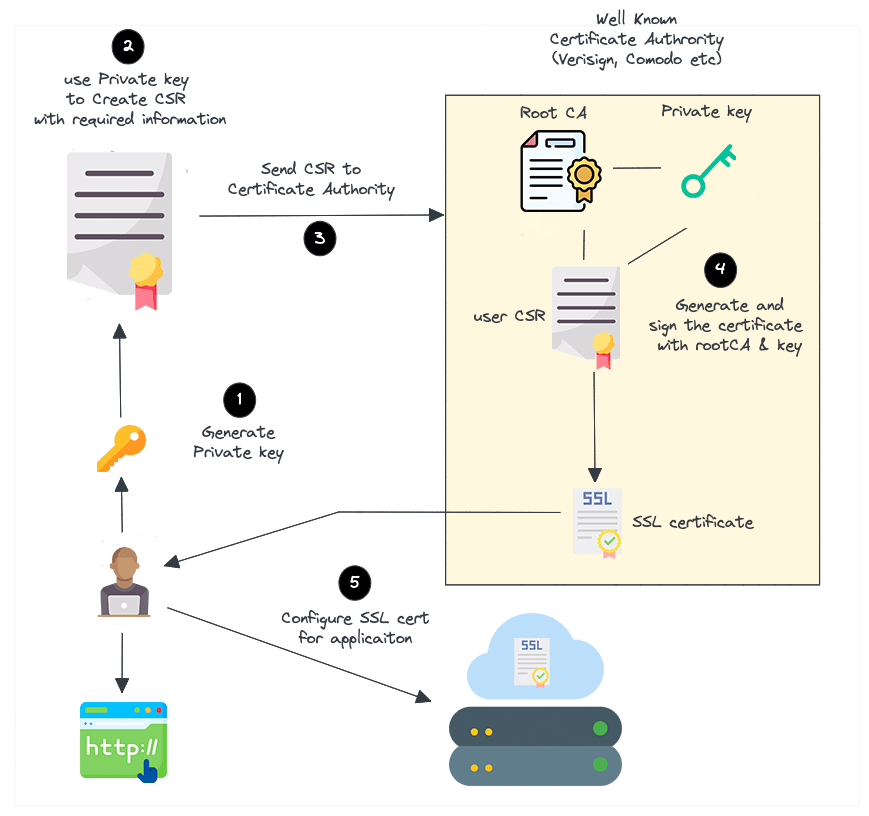
- Create a certificate signing request (CSR) with a private key. A CSR contains details about location, organization, and Fully Qualified Domain Names.
- Send the CSR to the trusted CA authority like Verisign or Comodo.
- The CA authority will send us the SSL certificate signed by their root certificate authority and private key.
- We can then validate and use the SSL certificate for our web servers.
But for a self-signed certificate, here is what we do.
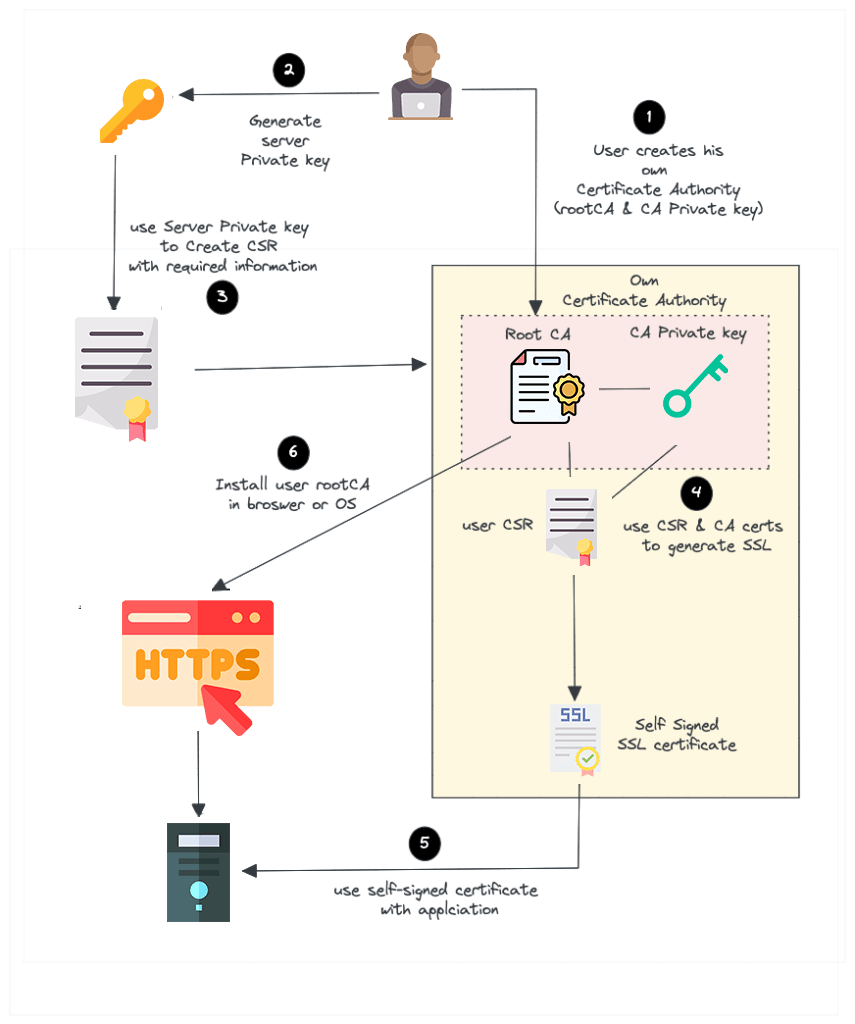
- Create our own root CA certificate & CA private key (We act as a CA on our own)
- Create a server private key to generate CSR
- Create a SSL certificate with CSR using our root CA and CA private key.
- Install the CA certificate in the browser or Operating system to avoid security warnings.
Most browsers & operating systems hold a copy of root CA certificates of all the trusted certified Certificated Authorities. That’s the reason the browsers won’t show any security messages when we visit standard websites that use SSL from a trusted and well-known commercial Certificate authority.
At the same time, if we use a self-signed certificate, our browser will throw a security warning. The reason is browsers only trust SSL from a trusted Certificate authority. But we can force browsers & operating systems to accept our own certificate authority. So we won’t see the security warning once we install the CA certificate and add it to the trusted list.
Also, we can use this CA to create more than one SSL certificate.
Create own root Certificate Authority
As discussed earlier, we need to create our own root CA certificate for browsers to trust the self-signed certificate. So let’s create the root CA certificate first.
Let’s create a folder named certs to save all the generated keys & certificates:
# mkdir -p /etc/certs && cd /etc/certsExecute the following command to create the rootCA.key and rootCA.crt. Replace subj details as per your need:
# openssl req -x509 -sha256 -days 3560 -nodes -newkey rsa:2048 -subj "/CN=DotandDash-Root-CA/C=IN/L=Pune" -keyout rootCA.key -out rootCA.crtWe will use the rootCA.key and rootCA.crt to sign the SSL certificate.
Create Self-Signed Certificates using OpenSSL:
Steps given below will create the self-signed certificates. We will sign out certificates using our own root CA created in the previous step.
1. Create the Server Private Key :
# openssl genrsa -out server.key 20482. Create Certificate Signing Request Configuration :
We will create a csr.conf file to have all the information to generate the CSR. Replace require info as per your need.
# cat > csr.conf <<EOF
[ req ]
default_bits = 2048
prompt = no
default_md = sha256
req_extensions = req_ext
distinguished_name = dn

[ dn ]
C = IN
ST = MH
L = Pune
O = DotandDash Technologies Pvt. Ltd.
OU = Admin Department
CN = *.dotanddash.in

[ req_ext ]
subjectAltName = @alt_names

[ alt_names ]
DNS.1 = *.dotanddash.in
DNS.2 = *.dotanddash.lan
IP.1 = 192.168.1.5

EOF
3. Generate Certificate Signing Request (CSR) Using Server Private Key :
Now we will generate server.csr using the following command.
# openssl req -new -key server.key -out server.csr -config csr.confNow our folder should have three files: csr.conf, server.csr and server.key
4. Create a external file
Execute the following to create cert.conf for the SSL certificate. Replace require info as per your need.
# cat > cert.conf <<EOF

authorityKeyIdentifier=keyid,issuer
basicConstraints=CA:FALSE
keyUsage = digitalSignature, nonRepudiation, keyEncipherment, dataEncipherment
subjectAltName = @alt_names

[alt_names]
DNS.1 = *.dotanddash.in
DNS.2 = *.dotanddash.lan
IP.1 = 192.168.1.5

EOF
5. Generate SSL certificate With self signed CA
Now generate the SSL certificate that is signed by the rootCA.crt and rootCA.key created as part of our own Certificate Authority.
# openssl x509 -req -in server.csr -CA rootCA.crt -CAkey rootCA.key -CAcreateserial -out server.crt -days 3650 -sha256 -extfile cert.confThis command will generate server.crt with a validity of 10 years that will be used with our server.key to enable SSL in web server.
If you want shell script to generate self-signed certificate with CA using OpenSSL with No Prompts then check GitHub Repo.
Conclusion
In this blog, we discussed how to create self-signed certificates using OpenSSL. Self-signed certificates can be used to enhance the security of online communication by providing an additional layer of encryption. OpenSSL provides a robust set of cryptographic functions and protocols that can be used to create self-signed certificates. By following the steps outlined in this blog, you can easily create self-signed certificates and secure your web communication.